Twitter
 Facebook
 Flickr
 RSS
RSSWednesday, June 30, 2010
Dem Bones ~ Day 2
Since the first day we spent most of the time in the classroom we decided to change it up a bit for day 2. We started by choosing a bone from the still life and taking it outside. Put your bone in the landscape and draw what is around it. So we found some shade and got to work. I could not believe it - 20 kids in a fairly small area - and they were SILENT for over 30 minutes drawing. Here are some shots of the students and their work:

Love to see them using techniques we teach!

completed drawings - wish we had time to push these even further getting them to add darker blacks and more greys!! 


last one is mine
I cropped a little bit - most needed work on their composition. Just a reminder though - these students are only 10/11 years old! Next we talked about aboriginal dot and xray painting and students decorated a box - their wire animal sculpture will adorn the top.


Students listed 10 facts about themselves and added a symbol to go with it - and they will use those symbols to incorporate into their skull! I cannot wait to see these completed tomorrow!
Tuesday, June 29, 2010
Dem Bones ~ Art Summer Camp
Finished Day 2 of Art summer camp today! I feel like it is Friday already. We have twenty students with two elementary art teachers. I am enjoying working with a new colleague.
Day One was a still life of some amazing animal bones.

Then we had the students create the tones using white and black charcoal sticks. We put some dramatic lighting on the bones to help them see the whites and blacks better. I really enjoyed working on mine too - but of course the life of an art teacher - you get 5 samples started and never finish one of them! I need to sit diwn and create like this more often (and finish)!
this is mine:

Student Work Below is Awesome!!!!!!!!!!!!!!!


Students also worked in a sketchbook to develop ideas for a wire sculpture. They created their favorite animal - then sketched a 'best guess' of the skeleton of the animal.
Loved this one: I am pretty sure this is how it might look, maybe!


We decided after day one that the students were a little bored, as we were with the bones already. The curriculum is developed by the art teachers that will teach the camps. I wish I wasn't so burnt out from the end of the year to put some better input into it. We were struggling a bit with what we had to work with at the end of the first day. So we came in on day two with some additional ideas we thought would keep the kids energized and producing throughout the day. Pics of those works to come...
Tomorrow we will be taking them with a camp happening at another school across the county to DC. 40 students, 4 art teachers and 2 parents...
We are going to see bones of course - at the American Museum of Natural History and the Brian Jungen show at National Museum of the American Indian.
Should be fun!!
Saturday, June 26, 2010
Getting Published!
One of my goals was to get published in an art ed mag. No real time frame on it, just one of the things on "my list". While surfing around my sites yesterday this pops up from School Arts: Looking for Authors: ClipCards Needed for SchoolArts Magazine. How cool - I already have 2 done thinking about which others I want to submit.
Friday, June 25, 2010
Lamination Station!
Well school is out and it is time to be productive! I plan on actually doing something this summer ~ not just taxi-ing my son around to his various baseball camps. As summer came to a close last year I felt very disappointed in my accomplishments, or lack there of. There are so many things I say - well if I had time I would do this or that, when in actuality I had time but I wasted it watching Dr. Phil or Oprah.
So for my first productive task - getting up and ready for teaching next year. This year I felt very unprepared and always rushing to get things done. I brought all my files from school home to organize. I have a binder where I keep the lessons that I have taught. Then I have piles of lesson ideas - things I want to teach or modify to teach, I have the usual school/HR/management type paperwork. And I have student handouts and resource materials. So I am setting up files to organize all this and get all the piles that collect throughout the year off my desk!
I started sorting all the lesson ideas into categories. Here it is in the early stages. I used port-its to start off so I could create folders that alternated tabs.

Then I have 2 other boxes that have student handouts and Admin/School/HR stuff in the other:

I have a large file cabinet at school which is very underutilized, basically because I keep everything in piles instead of files!
I decided I wanted to get all my class sets of handouts ready to laminate. At my school the laminator is like made out of gold and only one person holds the key to it. You have to submit your items and the gold key holder only laminates once a week. Well that doesn't really cut it with me being the control freak that I am. So I usually just let things go without laminating - or I don't have them ready in time to wait a week for them. We do however have a Teacher Resource Center in my county. It is a central office that has all kinds of equipment and materials to use or check out. It has a binding machine, LOTS of die cuts, paper cutters, and yes TWO laminators!! Where I can actually feed my own items in all by mybigself! It is just hard to get to it during the year, luckily it is open in the summer. You just call up and say turn on the laminator and by the time you get there it is heated up and ready to go!

I color coded all my class sets by table; laminated them, hole punched and connected them with a metal ring. I have several lessons where students use resource materials to help them along. For the 5th grade illuminated letters lesson I printed out info and several decorative fonts. For 4th grade Aztec Calendar symbol drawing and clay tile I give students a few copies of the Calendar and some Aztec design pages from a Dover clip art book. For the 1st grade aboriginal dot paintings I give students some animal pictures to draw from. 2nd grade Native American pinch pots student look at Dover clip art of Navajo, Hopi, and Pueblo designs. 3rd grade Instrument Collage students get illustrations of instruments to help them.

 This should help a lot in that students can help keep things organized. I found that all the handouts were getting thrown into one pile and it would take me forever to hand them out to the tables for the next class. I can easily keep them in a file and pull them out when I need them - some get used for more than one lesson.
Tuesday, June 15, 2010
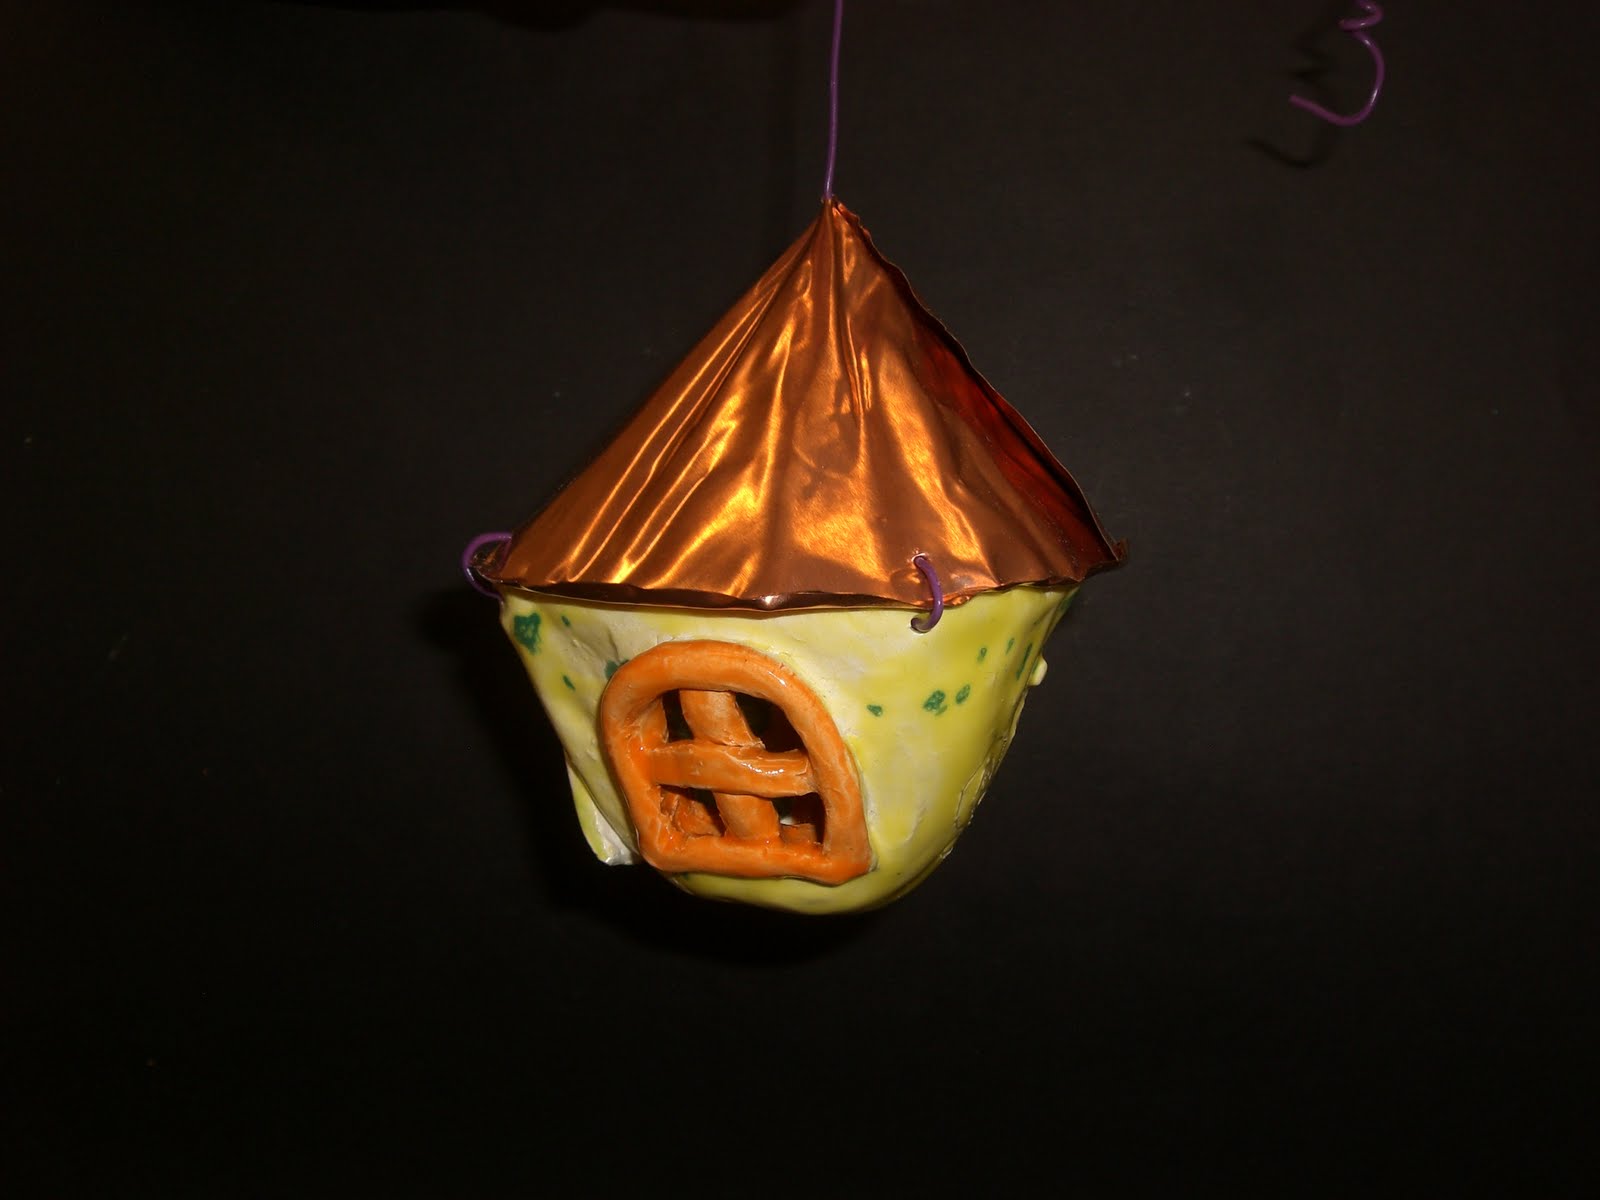
Faerie Houses
Way back when I wrote about a site where I found some inspiration for a clay project.
I finally taught the lesson to my 3D 4th and 5th grade elective class and had some great results. I enjoyed making a sample and may have to make it my new signature gift item.
Here is my sample:

window with shutters

round window with inscribed swirls
rounded top window
It is a simple pinch pot with windows. I made three small holes around the top and made a cone out of 36 gauge sheet copper for the roof - the kind I use to teach repousse. The kids LOVED it and the students who took my 3D class 1st quarter were mad they didn't get to make them. Here are some of the student's work:  This is a good student sample - you can tell she looked closely at my sample. We used twisteez wire to attach the roof and I gave them the option to add beads to the hanger.
 I had some other softer metalic sheets that were colored. They were a bit too soft though - I think something in between the two would work best.
  This one looked like a nice votive holder before she put the roof on. Her windows were heart shaped.
I am debating on making this a 5th grade project - it was tough to get the roofs on so it would be hard to help an full class - I need to work on a better was to attach them. Suggestions?
I want to make some more!
Monday, June 7, 2010
Winding Down... the rabbit hole
It is my last full week of school. I am getting all the student's portfolios in order and making sure all clay projects are caught up and trying not to run the kiln again but of course because a third of a class missed glazing day due to SOL's I am going to have to let them glaze!
I had a little 'moment' on Friday - you know those moments that make it all worth it... My classroom is right next to the SPED room which at times can be quite disruptive but other times can create moments like this...
One student who is autistic - and proud of it... he wears some of the best autism awareness shirts. He loves art and gets fixated on certain artists or artwork. At the beginning of the year it was Degas' dancer which I have a small replica of in my room. This came from him watching Night at The Museum 2. Then he was into the movie UP! and created houses and drawings from it. Now he is big on Alice in Wonderland. I have not seen the new release yet but apparently this is what Alice sees when she falls down the rabbit hole. I came out into the hallway after all my classes on Friday and found him hanging this - and still adding to it:
The one part that is in blue ink - the person in the frame on the second image - that's me! I felt honored to be added to his masterpiece.


His teachers invited me in to the classroom to see what else he had done and I saw this! His use of perspective was blowing me away! Check out the little door in the lower right corner.

Subscribe to:
Posts (Atom)