Twitter
 Facebook
 Flickr
 RSS
RSSSaturday, October 16, 2010
Fundraiser Lessons - 3rd Grade
Self Portraits
I have the third graders create a head and shoulders self portrait - the way they currently know how to. This way I can see what they already know and how cartoon-y or anime-y they draw people. I get a wide range of abilities like these:


- create the oval
- divide the oval in half vertically and horizontally
- Measure on ourselves and on Vinny and Frida to determine that our eyes are in the middle of the oval
- Discuss how the face is 5 eyes wide - we measure on ourselves
- Put a football shape right in the middle of our oval - create two more footballs on equally on either side. We know that the eyes will be the 2nd and 4th football, erase the other 3.
- Divide the space from the chin to the middle in half, create a guideline. This is where our nose will rest.
- Below the nose make a spread out M for the top lip - the width of the mouth should go to the middle of the eyes. Create the bottom lip.
- Measure on ourselves how the top of the ear lines up with the eye and the bottom of the ear with the bottom of the nose. Create ears that go from the middle guideline to the bottom guideline.
- Divide the top of the head to the middle in half - this is the hairline. Stress that hair does not just grow out of the top of our head - it grows all the way around and on our forehead.
- We turn the paper over and do a close up of an eye with detail and then add the detailed eyes on the sketch.
- After practicing once we more on to the final paper - go over lightly sketching in the guidelines and then students use mirrors to make it look like them.


Monday, October 4, 2010
Fundraiser Lessons - 2nd Grade
Flower Still Life
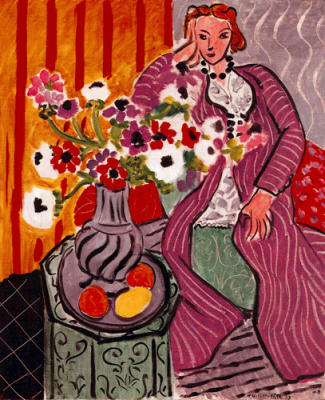 Students begin by looking at Henri Matisse paintings in a power point. We talk about the patterns and how he repeats colors at least three times to keep our eyes looking around the painting.
  Next we work together to get our vase on the paper, then we make it the shape we want it. We create an entire "under drawing" in a very light color (peach or yellow). Then we create the table to go behind the vase - we talk about how it would look like it was hovering in mid air if the table went below the vase. Next we put a large flower that touches the top of the page. Then one that touches each side. Students will fill in as many flowers as they want - then we will move on to color.
  I show students how to add color in at least three places, fill in solid, make a shadow on the vase and table. We also talk about if they want the vase to be see through (transparent) or solid (opaque).

Fundraiser Lessons - 1st Grade
Y Tree with a Family Story
We talk about the four seasons and what a tree looks like in each of those seasons. We talk about the difference between evergreen and deciduous trees. (Virginia Standards of Learning for first grade Science 1.4 Life Processes).
 I show them how to make a tree using the letter Y. I pass out practice paper and black crayons and students follow the steps with me as I make a Y tree. I will show them how to make a tree in each of the four seasons by adding details.
 Next class they come in to complete their tree stories. I remind them to fill in all the peek-a-boo spots so their coloring is nice and solid. For the final touch we use white to make clouds in the sky. Then they pick from several colors to paint their sky with watercolor. Even though they did it last year on their dream houses, they still think it is magic when their clouds appear in the sky.
Last year's Y Trees on Artsonia


Fundraiser Lessons - Kindergarten
Dream House Using Shapes
First we talk about shapes. I describe each shape and see if students can guess which one I am talking about. I have big laminated shapes with a magnet on the back that I put on my white board as the students guess them. I throw in one harder one - Trapezoid - to see if they get it - sometimes they do!
 Next class - students sit together and we read "The Big Orange Splot" by Daniel Pinkwater (LOVE HIM). It is the story of a man who gets orange paint dropped on his house and instead of returning it to it's original look to keep a 'neat street' he paints it like all of his dreams! One by one each neighbor is sent to convince him to change it back but instead they also change their house to look like all of their dreams. I like it because it talks about being original and not fitting in with everyone or everything else.


Fundraiser Lessons
There has been a lot of talk about the lessons for the magnet fundraiser so I am going to post what I do for each grade. This fundraiser funded my entire program this year. I don't think I have sacrificed any learning for a good product - they are lessons I would be teaching anyway. I will put each one in a separate post, I probably won't get to them all tonight.